Wednesday 28 February 2018

she's a garden girl. | Be Inspired Blog Hop


It's February 28th and we are just off our very first official snow day of the year yesterday.
Typically on this island in the middle of the Atlantic Ocean we've had several snow days. It was actually starting to feel like we were never going to get any snow.  Well, we spoke too soon.

I am simply oh so ready to be a Garden Girl.


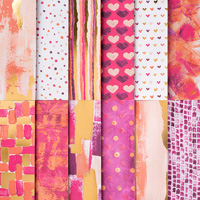
This is my very first time hopping with the Be Inspired Design Team and I am very excited to be here! We have some amazing talent and I am so happy you have dropped by to check it out. Each month they have a theme in which to help creative types to step outside their comfort zone. Today's theme is TEXTURE.

What is TEXTURE?

1. (noun) the feel, appearance, or consistency of a surface or a substance.
2. (verb) give (a surface, especially of a fabric or wall covering) a rough or raised texture.

How do you create TEXTURE IN STAMPING?

Creating texture in stamping is not limited to some of the ideas but rather creating texture can be somewhat of an opinion - you might look at something and think there's texture but someone may see a project in flat thus not seeing the texture that you might.

1. Adding multiple layers of paper, trims and stamping to your project.
2. Using mixed media projects such as sprays or embossing paste such as today's project.
3. Use embossing powder in order to raise a project.
4. Add glitter or glimmer papers.
5. Use the fine tip glue in order to add gloss.
6. Add embellishments like sequins, pearls, buttons, etc.


Today's project uses the Embossing Paste by Stampin' Up! along with a cloud mask. The paste was applied through the stencil on water color paper. Once dried I used the Stampin' Up! Write Marker's and refill inks in order to colour the background as well as the stamped images.

This project totally got me ready for spring despite the huge snow flakes outside my window. It's trickery at its finest. :)

Are you ready for Spring?
I hope that groundhog was right...

Be sure to keep hopping to my friend, Carolynn Sander - she's a shining star here in Canada.

Friday 23 February 2018

Creating a masked background |#tgifc148


Oh hello, my beautiful friends!
I just can't get enough of mermaids or unicorns these days!


Today's project was created for the TGIF Challenges Design Team, where each week on Fridays we bring you new creative challenges to inspire you.  This week we are looking for your masking techniques.


While there are many ways to mask, I opted to use a simple bit of washi to create a square background.  The bottom is a Post-it note. Using a sponge and my Tempting Turquoise ink, I was able to mask "an ocean".


Thanks for dropping by and be sure to link up your own projects by Thursday 10am PST on the TGIF Challenge Blog.

Cathy

Thursday 22 February 2018

Meet Mr. Dragon Pants Face. | Fancy Friday Blog Hop


There he is.
Mr. Dragon Pants Face.
Giving you the stink eye.
A face... oh so perfect for a birthday card.
Wouldn't you say?

Today's project was created for the Fancy Friday Blog Hop team. 
This is a team of current and past Stampin' Up! Artisans so it's safe to say that every month you are in for a real treat. Each month we come up with a theme to help inspire ourselves and all of our stamping communities.  Thanks to Krista Frattin for designing today's colour challenge logo!

PROJECT DETAILS://

Back to that face.
Mr. Dragon Pants Face guy comes from the Myths & Magic Specialty Designer Series Paper.  All I did was cut him out.
Of course, the background of the card is a little more tangly.
First, I applied the Stampin' Up! embossing paste through the brick mask onto watercolour paper. After it dried (or not. more like I didn't want to wait for it to dry.)
...As I was saying, after it dried, I used my emerald envy reinker and an aqua painter to apply some colour to the background. I dropped a couple specks on to the surface as well to look like rain drops.
After it dried... I really dried it this time with a heat gun.
Then it was a "bit of this and a bit of that".

Oh. You noticed the ballon. I cut that sucker right off the one of those Party Pandas (an exclusive Sale-a-Bration stamp set). I cut the twirly whirly string too. I glued it all together and got perfection!


Inside the card, I continued the wording from the sentiment stamp set and added a knight (to fight off the dragon, of course) found in the Magical Day stamp set which I had previously coloured using my Stampin' Up! Blends.

Happy Birthday!

Thanks for dropping by today - Krista Frattin is up next. Krista's style is amazing and she always seems to inspire me! 
Are you following me on instagram? 
This is where I show the majority of my projects and inspiration, along side my loves and life.  
Be sure to find me @cathycaines.

Sunday 18 February 2018

Husband and Wife. | Scrapbook Sunday Blog Hop


Scrapbooking is more than a hobby for me.
It's a way of gaining perspective and lately a way to count my blessings.
As my young children grow, I want to remember the little stories side by side with the pictures.
But its these years that are even more important to document my own memories.
Because of these reasons and more,
I am a story teller.
Thus my scrapbooking is more about the words than the photos.
You can call my style simple but to me, 
it couldn't be more perfect.
The focus is exactly where I want it to be.
The words.


Here we are.
We managed to get out for Valentines Day. After enjoying a couple bottles of wine and food at Blue on Water, we headed to meet up with friends at The Adelaide and ending up here at the Murray’s Premises Hotel.


We look pretty happy don’t we?

Well we are.
Things aren’t always perfect for us. We go through our ups and downs. But in the end there’s something to be said when your smiles are as big as this.


Loving each other always.

Ryan and Cathy.
February 16, 2018

PROJECT DETAILS://

Today's project uses current Stampin' Up! products. The project began with a page from the Petal Passion Designer Series Paper.  The journalling was done in Adobe Photoshop with the Remington Noiseless font in size 9. After printing through my printer, I layered some basic black cardstock and then the whisper white cardstock over top. I created a subtle background using sponge with Pool Party ink through the brick stencil. Finally stamping some simple hearts from the Lovely Friends stamp set.


Thanks so much for dropping by today! But don't stop here because this Design Team is packed with talented creatives. Up next is Jessica Brown!

BLOG HOP PARTICIPANTS:

Cathy Caines (YOU ARE HERE)

Thursday 15 February 2018

Sure Do Love You. | Stampin' Up! Artisan Blog Hop


Welcome back to another Stampin' Up! Artisan Design Team Blog Hop!
Be sure to sit down and relax to check out all 16 projects from this talented team from around the world!


Today's project was created using the Stampin' Up! Sure Do Love You Bundle, which includes the Lots to Love Box Framelit and the Sure Do Love You stamp set. These items are part of the 2018 Stampin' Up! Occasions Catalogue. While you may zone into the word Valentine, this set is here to stay with its fun hearts.

PROJECT DETAILS: CREATING SOFTNESS//

Today's project was created with the idea in mind to use muted tones in the hopes to create a more softer feel.  I created softness in three different ways in this project:

1. Use a soft coloured ink: By starting out with the watercolor washed heart in Soft Soft Ink, I could get that toned down effect.

2. Stamp off your ink: The heart shaped wreath around it was stamped off in Old Olive Ink to maintain the softness of the heart. "Stamp off" = Ink up your stamp as you normally do; however, before stamping on your project first stamp on a scrap piece of paper. Without re-inking, stamp your project.

3. Divide your layers with soft elements such as vellum or lace: Vellum was placed behind the white paper to soften the sharpness of the Painted With Love Designer Paper. The same goes for the placement of the Very Vanilla Lace Trim.

Overall, this cute little box was finished off with small leaf die cuts, Basic Pearls and some whisper white Baker's Twine.


Are you following me on Instagram? That's where I do most of my posting - be sure to check it out.


Thank you so much for dropping by today!

I am so excited to see what Charlet Mallett and the rest of the team has created for today's Blog Hop and Stampin' Up! Facebook Post! Keep hopping!

BLOG ROLL


Please see below for a list of Stampin' Up! products used in today's project:

Wednesday 14 February 2018

Cake Soiree Bundle | Stamp to Share International Blog Hop


Hello and welcome to the February Stamp to Share International Blog Hop!
And if you are in North America - Happy Valentines Day!
I am so grateful that you took the time out to drop by today!


Each month a current Stampin' Up! product suite is selected to inspire you. This month the team selected the Cake Soiree Bundle included in the 2018 Occasions Catalogue. I can't wait to see what all the artists have to share.


My favourite part of this Cake Soiree Bundle is the Sweet Soiree Designer Series Paper shown above.  Each piece of this Sweet Soiree Specialty paper is foiled with silver which gives it a definite wow factor.  I am drawn to the calypso coral piece the most as you can tell in today's project.

PROJECT DETAILS://

While this card isn't complicated, I truly believe that your projects never have to be. For today's card, I used the Stitched Shapes Framelit Dies and cut out the foiled cake from the specialty paper.  I stamped the "Best Wishes" sentiment from the Cake Soiree stamp set and then clustered it all together to create a quick and simple birthday card.

And yes, I stapled the mini silver sequin trim to the card base under the die cut to make "adhering" quick and easy.

If you are looking for more inspiration and another reason why you need that pack of paper, here is a scrapbook page that I did as part of my Scrapbook Sunday Blog Hop team last month - be sure to check out the link to see more.


Oh and by the way, you are pretty amazing! #cuetheblush

Thanks so much for dropping by today - Moira McIlroy is up next! I can't wait to see what she has created along with the rest of the team.

Friday 9 February 2018

stars and stripes | #tgif146


Today's project was created for the TGIF Challenge Design Team. Each week the team provides  inspiration to help your creative juices flow.  This week is a sketch challenge.  Hope to see you join us by linking your projects each week on the blog.


If you are familiar with the Stampin' Up! catalogue, this project may test your knowledge.  The star is a die that is in the Mini Treat Bag Framelits, and yes... there's a heart too. I am a sucker for stars and stripes so I couldn't help but use this sketch to make it work for my style.

Oh and yes, I am totally in love with the glimmer ribbon pack in the Sale-a-Bration catalogue. Best to scoop that up soon because its only around until March 31st!


As always, thanks for dropping by
See you soon,
Cathy

Thursday 8 February 2018

i am fortunate to know you | One Stamp At a Time Blog Hop


Welcome back to this week's One Stamp at a Time Blog Hop.
I am a lover of little hearts.
And well, I am a lover of chinese take out boxes.
So for me, this Stampin' Up! Fortunate To Know You stamp set was a must have product.
Today's projects are created with keeping it simple in mind so that you can make multiples for valentines. 


Step 1: Using Stampin' Up! layering circle framelits, die cut the largest circle.

Step 2: Stamp or write fortunes on strips of paper to place inside the paper fortune cookies.  I've also placed some ribbon inside.

Step 3: Place fortune in center of circle. 

Step 4: Fold top side of circle down and then fold up the bottom like you are making a burrito. Hold in place with a glue dot once you have the hang of it.

Step 5: Pick up the paper cookie in your hands and bend the cookie in half with the circle "flaps" on the outside. 

Step 6: Play around to get the shape just right.

Step 7: Secure with a glue dot.


The co-ordinating card was created using the Tutti Fruitti Designer Series Paper Stack and some basic Black Baker's Twine. Of course, I coloured the little heart using the Stampin' Blends markers.

Don't stop here though - Keeping hopping along to my Artisan friend, Dani Dziama! 

Cathy