Thursday 28 September 2017

Can't get enough of Halloween Treat Tubes | Fancy Friday Blog Hop


This month's Fancy Friday Hop is all about 3D projects.
So your mind is going to be blown.
I was in a hurry to play with these treat tubes from Stampin' Up! because I truly feel like they are going to sell out - get them while they are HOT!
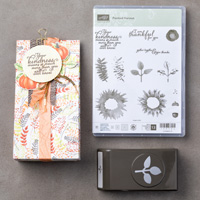
To create quick tags, I quickly stamped this word image in the shape of a cat.  And yup - that's a cat punch.  Honestly - two seconds and you are done.

Wam. Bam. Thank you Ma'am.


If you fell in love just like I did, this is the Spooky Cat bundle that you need to add to your craft collection:


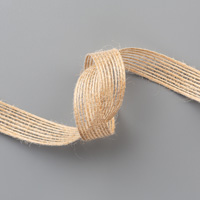
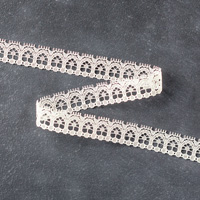
As always I like to use mulitple ribbons on my projects to give it texture... and of course, make it look super fun! Use a little bit of double side tear tape at the top to secure the thickest ribbon and it holds in place perfectly!

This is another quick and easy way to create a Halloween treat!


Soon, I discovered that two of the Halloween Treat Tubes fit perfectly inside a 2" cellophane bag from Stampin' Up! Decorate them with a cute topper and you've got yourself a dandy treat!


Since I was playing I decided to play along with the TGIF Challenge Blog Design Team in their Tic Tac Toe Challenge.  I love these challenges because.. well.. its like a game that I can win.  And when there's a competition - I go hard. I am a gamer through and through.


I totally won by getting a line straight down the middle.
Don't act like you aren't impressed! Be sure to play along too!

I like you. I like you a lot. Thanks so much for popping by! And if you are interested in seeing me make these projects live then be sure to check out the video on my Facebook page in the videos section of In the Cat Cave.

Thanks so much for popping by - be sure to keep hopping with my gorgeous and talented friend Cindy Schuster!

Keep Calm and Be Thankful | A Paper Pumpkin Thing Blog Hop


I am back again with all the gang giving you alternative ideas for your monthly Paper Pumpkin kits. This month there's very much a Fall feel.  Something I am simply not ready for. On the East Coast of Canada, the Fall isn't actually too bad but the days get so short and I think that's what really gets me.


As you can see, this month's kit has layers and clusters that I totally love.  So for me making an alternate idea really wasn't too far from the suggested projects. To create the box above, I created a cluster and stamped that super cute sentiment on the mini tag.  I wrapped the copper and white baker's twine around a mini pizza box, which can hold the little 3x3 cards included in the kit. Those mini pizza kits are just too cute for words!


When I first saw this leaf stamp, I immediately thought about the Canada 150 logo.  I wanted to water colour the image... and so I did!  Using my Stampin' Write markers I just flicked colour all over the leaves.  Afterwards I applied some water over top to get the colours moving and mixing. Looking back I really wished that I used the copper embossing powder to match the twine - always a next time! C'est la vie!

This stamp definitely has some amazing possibilities so I can't wait to see what my friends came up with! Thanks so much for dropping by - be sure to keep hoping to my Canadian friend Carolynn!

Cathy

Friday 22 September 2017

Z Fold Madness | #tgifc126


Folding upside down and inside out is not really my thing.
Not because I don't like it.
It's because I have to dig out my scoring tools and board.
That's why when someone challenges me to create a folding fiasco project, I roll my eyes and then willingly get to designing.


In the end, designing this card was fun.  I cut my card 9'x6" and scored at 3" and 6". I then cut a slant from the 6" mark... but I just eyeballed that. From there I created each little panel by covering it with the Stampin' Up! Quilted Christmas Designer Series Paper Stack.

If you held the card in your hands, the front would look like this:


I just couldn't resist googly eyes.
I mean..
right?

... peek-a-boo... I see you!


"Happy Christmas" is the Around the World Designer Series Paper - Gasp! It's not a stamp! I love the different languages that the page has.

Be sure to hang out with us at the TGIF Challenge Blog.
I promise. It will be fun!

Get fancy and take a walk on the wild side.
Cathy


Wednesday 20 September 2017

Packaging Rescue | Let's get Hopping Blog Hop


Hi friends!

With several natural disasters that have been devastating our Earth it's top of mind as to how we can all do our part. Today's blog hop is about finding ways to be thrifty and to use what you have.


While, I do many things to stretch my dollar re-using my packaging is a consistent thing that I do.

THRIFTY TIP:Re-use the cardboard included in paper products.  

Use the cardboard by pre-cutting the cardboard and placing it in an accessible spot in your craft room. Depending on my projects, I often cut it to 5.25" x 4" - this size is perfect for standard card sizes.  Right now I am doing a lot of tags so I cut the pieces down to fit those sizes this week.


I also re-use the plastics included in the packaging.  No matter the size, I re-use the packaging for many reasons.  Currently, I am creating product shares as a Stampin' Up! demonstrator.  I re-use the little baggies and containers as much as I can. I also use the cardboard to keep the items sturdy for shipping. In the photo below, the plastic is an old thinlets package.


There are so many things that we can do but maybe you'll think twice when you go to throw out your packaging next time.

Keep learning and click 'next' to check out Jennifer Frost's thrifty ideas.

Thursday 14 September 2017

Your Kindness | Stampin' Up! Artisan Team Blog Hop


"Your kindness means so much more than you will ever know."

Those words.  I see you nodding.  It rings so true.
As beautiful as those words are, the two-step stamp set is equally as gorgeous called Painted Harvest by Stampin' Up! I am thrilled to be part of the Stampin' Up! Artisan Design Team this week as we share ideas and inspiration with this stamp set.


For a stamp set such as this, you need time to sit down and play with it.  For me, I set out to use multiple colour combinations to create this flower.  You can see that I tried blue, yellows, reds and finally ended up falling in love with the pink.

COLOUR COMBINATION: BLUSHING BRIDE + MELON MAMBO + SAHARA SAND 


"gather together & give thanks"

Above was an additional project before I created my final project.  The flower was created in my "playing" past but it was so beautiful that I decided to make it into it's own card.  This is a little more of my clean and simple style.


Although this flower has been used to create a sunflower, you can see that you can turn these images into a beautiful flower of any colour. Doilies and pearls always soften your projects and works perfectly with these sentiments and images.


I hope you have the most beautiful day.

Be sure to keep hopping as my friend Dani is up next!


Tanya Boser

Products used in my projects today includes the following:
SaveSaveSaveSave

Sunday 3 September 2017

Back to School Signs 2017 | Free Printables


With another school year just around the corner, I created these signs for anyone wanting to capture their family's growth and progress. Just click on the sign to go to the 8.5x11".PDF file and print! I personally love the look of black and white but I created a rainbow version as well! 
Enjoy!