Thursday 28 February 2013

Mini album & Cdn Scrapbooker

Well, its the last day of February and I had a lot of things I wanted to do but I didn't quite get there this month.  All the same I took a few classes at the Paperie and am loving Sara Case Strickland's Yearlong Album Class!! Thanks Sara!! I'll show you her first couple projects when I get my pictures on them.

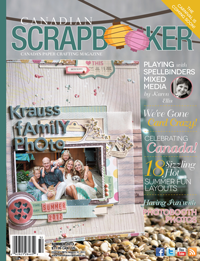
I completed the layout for the February Canadian Scrapbooker Magazine this morning - I love this Bo Bunny Crush collection!
Materials: Bo Bunny Crush collection + cut outs, Bella Blvd Ciao Clips Sophisticates, Stampin Up 12x12 white cardstock, Freckled Fawn washi, Robin's dew drops and AC precision pen.

 This layout also has some hidden journalling - this time, I sewed around the whole layout to create a border. When doing so, I sewed one side of the pictures down. This is all that is holding the pictures in place. If you flip up, you can see my note to my "valentines".

I have also had a little project of doing a mini album for my mother in law, Nancy.  Her mother, who resides in Ohio, fell and broke both her ankles.  It was quite the accident and we all certainly wish we were there to help.  Nancy asked if I could put together a collage... of course, me being me, thought I have these little 5 x 5 albums, I'll just slat that together... ummm... yeah, its not a complicated album but it does take time especially when there's 20 pages!  Their whole family was so great to accommodate our family when we were down their in the Fall that I simply felt a little collage wouldn't quite be enough to say "wish we were there".  This album was largely made out of several simple stories collections.  There was a number of Graphic 45 family tags which play nicely with the situation.  I also left a lot of negative open space for Nancy to write her own journalling. Enjoy!


Make sure that you stop by tomorrow because we are having a "Crop Circles Blog Hop".

Cheers!
Cathy

Saturday 23 February 2013

Music


I just posted this to some friends online and I thought I should post to my bloggers as well.

Just a little something that works for me... 

Thought I would pass along... Are you ever stuck for words for a picture? especially if its so special to you? Perhaps you can't get the right title... I call myself an emotional scrapper. In other words, I HATE doing themed pages. It feels like an obligation... I scrap the emotions with the pictures. And sometimes how I felt or feel doesn't come as naturally as I want it to. When I feel creatively stuck I play music. Maybe most of you do it anyways... but tv doesn't do it... its Adele, Coldplay, Phillip Phillips, Lumineers, Mumford and Sons, etc... list goes on. It can be anything.

Bottom line... want to scrap something emotional? Play some music.

Cathy

My Steeped Tea


A new project came my way a couple weeks ago, in that I needed to make a tie between a company called My Steeped Tea and weddings!  A family friend, Ann Marie Kenny is a consultant for this growing company and was attending some bridal shows so she asked me to prepare some tags. I must say its a neat idea to try this for a bridal shower or baby shower.  There's cute wedding gifts and favors, of course.  A tea bar for an outdoor wedding ceremony is fabulous.

Here are some of the items we came up with!  This time I used purely Stampin' Up products.

These boxes are made using the Boutique Boxes Designer Printed Kit and the cute little tea time trinkets. There's also a couple small pieces of the Print Poetry DSP paper pack.  All of these items are from the Spring catalogue.  I adore this pack - the feathers and pre-cut doilies are awesome.  As a scrapbooker I would use this for anything.  The baker's twine also comes in these packs.  Use these boxes for anything from wedding favors to gifts!

 Next is a card I made that could be used as a wedding shower invitation.  The stamp set is adorable. Supplies used is Print Poetry DSP paper pack, vanilla cardstock, Stampin Up doilies, vellum, 'Oh Hello stamp set', soft suede ink, early espresso cardstock and Tea Shoppe stamp set.


Next are some clear envelopes that I made using the Bigz die called Petite Pockets... Its truly that easy to make these envelopes.  I used vellum and some sticky strip to hold it together.   I then used some linen thread as well as the twitterpated paper to label them.  I used the Morning Cup stamp set for this and colored using the blender pens and ink pads. You'll see  basic pearls, as well as a piecing mat.  I also used the decorative label and curly label punches.


The next couple pictures continue to use the punches as well as the Morning Cup tea set.  I added some pink pirouette ribbon, some crumb cake tulle and the chantilly trim ribbon.


If you think that looks like a rattle (which I must admit, I did), its actually a tea infuser with a sweet heart... speaking of which... if you like the infuser, these heart shaped tea cups are the sweetest!!!


Make these simple tea bag holders with any tea by just tying baker's twine and a punch. I used the Stampin' Up heart framelits for this particular one.

The tea sticks, I used some banners to add a fun element to them.  I used the Print Poetry and Twitterpated paper along with some pearls and linen thread.  The card was made using the Tea Shoppe stamp set, Print poetry paper, soft suede ink, pacific blue cardstock, vanilla cardstock and the flowers come from the spring catalogue Artisan Embellishment kit. Check out this link to see the beautiful little girl's tea set.
In addition to the above, I again used the Print Poetry DSP paper pad, Tea Shoppe stamp set, soft swede ink, some discontinued hat pins and the lace also comes from the Artisan Embellishment kit.
The next labels are similar to some wedding ones I did in October.  This is a simple stamp from the Apothecary Art stamp set, labels framelets, pool party cardstock and basic pearls. The tin uses the Morning Tea stamp set, as well as the discontined melon mambo grosgrain ribbon, melon mambo cardstock, Stampin' Up brights collection pens, as well as just a marker for the doodling.


Finally I used My Digital Studio (MDS) to create this sign for the table at the weding show.  I found the bride and groom image online, brought it into MDS to create the border and text.  I then added the basic pearls and trim (adorn elements kit) to give it some more "punch". I also backed it onto Basic Greay cardstock.
If you have any questions on what I used or how I did it, just send a comment and I'll let you know.
Cathy

Tuesday 19 February 2013

Jade Series complete

Over the past two days I was on a mission to finish the Scrapbooksteals Jade Series.  I thought I only had two layouts left to complete... but I forgot about this weeks sketch.  By some miracle I finished this sketch in one hour... and its a little wild... its also not as close to the sketch as most would be but it is 100% inspired by it.

Lately I have been using a lot of doodling and stamping on my layouts.  So, I made a point to stamp on this layout to play along with my local scrapbooking store's weekly challenge. You have  until Sunday coming to play along!

 Check out the sketch to the right:

It's important to see the my final layout to look like the sketch.

I started out wanting to do my "letters to Santa" layout - the pictures were sitting there along with the transparency.   Quickly I played around with different background colors to help the transparency pop.  I landed with Basic Grey Basics lined paper... which plays perfectly with my theme of "letters".  I thought I would write my journalling directly on the page using the lines, as well as note the date in the right hand corner as if I were writing a journal entry.  Next I looked again at the sketch and figured my transparency wasn't quite going to work as the "heart" shape.  I grabbed my pen and started drawing circles with my American Crafts precision pen.  I figured that if I messed up I would grab another sheet from the pack.  Loved it.  I then played around with the photos and turned the sketch.  Perfect.

Next I added two shades of Mister Hueys (Plum Thumb and Peppermint) specks. I grabbed some more grey patterned paper and a doily and some pop dots... I then envisioned the journalling but I wanted the journalling to pop.  So, I grabbed my gesso (as Ana-Marie Wolniak would..) and painted some white on the page... Nope. That didn't pop enough.  Since Plum Thumb was sitting on my desk, I dropped a couple drops and out came a pinky red.  I loosely applied that and set it with my heat tool.

Finally I grabbed my new Stampin Up Sent with Love stamp set (which I have used on two layouts in 24 hours) and stamped away along with some thickers. Cool, hey?
Supplies used: Glitz transparency, BG basics paper, Stampin Up sent with love stamp set, Stampin Up "Oh Hello" stamp set, Mister Huey's, American Craft precision pens black & brown), acrylic gesso, Simple Stories Documented paper, Simple Stories Handmade holidays tiny type stickers, and Stampin' Up doily.

Next I have the week 5 mojo series - This is a two page layout, in which I decided to tackle Christmas morning.  I despise doing holidays but they mean so much to me because often its family I don't always get to see. However there's always too many pictures and just too much that I want to capture.  This layout has a hidden journal tag (see the heart flag) which explains the "goings-on". I changed up the sketch a little as I wanted my pictures to touch.  Instead of my pictures going up and down I used tags.
Supplies Used: BG nordic holiday paper & stickers, Simple Stories Handmade Holidays paper, stickers and paper pads, Simple Stories Summer fresh paper, BG chipboard stickers, Simple Stories year-o-graphy paper, and Studio Calico badges.

Lastly the week 6 mojo series - I adored the layout and adored the layering.  In fact, I decided to play along with the Scrap That Chat designer challenge to layer.  You can see that I have 5 or 6 layers and could have kept going.  Sometimes I just pile up a handful of scraps and lay them down on a piece of background paper... I then just start adhering by using pop dots and peeling back corners... (probably not recommended.. most people don't adher until its all over.. not me!  I commit!)

Supplies Used: Bell Blvd Baby Boy collections, October Afternoon Midway washi, Doodlebug Loopy Love  letters, AC precision pen, Shopevalicious.com v2 badge, Stampin Up sent with love stamp set, Freckled fawn wooden veneers, Stampin Up pool party ink, Studio Calico vellum shapes, Little Yellow Bicycle paper crafting kit, Carta Bella Traditions & Winter Fun stickers, MME enamel dos, Freckled Fawn washi, Bella Blvd washi and FancyPants Blissflul Blizzard stickers.

Here's some close ups - lovin' those enamel dots and vellum shapes!  
 
I am finishing up a mini album for my in-laws and will post my tea items soon.  Lots of things on the go!! Would love to show you a sneak peek of my "twinchies" but I think it will give too much away.

Have a great day!
Cathy

Thursday 14 February 2013

Happy Valentines!

Happy Valentines Day!!

I am just quickly popping by with a layout I did last week for Stuck on You Sketches.  But SPOILER ALERT as I used this for a friendly "Same But Different" sketch.  So if you are involved in the Same But Different, stay away as the reveal is not until the end of the month!!

My father had his 57th birthday yesterday so I got my new "By the Tide" stamp set and created the following card with the help of the Mojo Monday #280 sketch. The fish is embossed with the Stampin Up early espresso embossing powder.  I then applied some frost white shimmr paint on it with a q-tip and it looks gorgeous.

Supplies were all Stampin Up: By th Tide stamp set, Pacific Blue paper, Poetry Prints paper 4x6 paper pad, Early Espresso paper, Very Vanilla paper, Crumb cake tulle, and frost white shimmer paint.

I showed you a sneak of this about a week ago and and if you remember this was the "ingredients" plus more supplies on top of that.

I was actually inspired by a Two Peas video, which I cannot find at the moment but I hope I can link that up shortly.  As such I cut up the papers and started layering.


I didn't love the colors so I didn't know what I was
I didn't love the colors of the challenge and I didn't know what I was going to do with it. I decided to add the blue color.  This matched the pictures I picked out as Miss J's eyes pop. To tone down the white, I whipped out my Tim Holtz broken china distress stain. Thanks to Sara Strickland I now have more ways in which I can use the stuff... but it also means more of a mess.  I just put some of that on my kraft sheet.  I then soaked up the dye with the ribbon - anything left over I just dabbed on the flowers and the butterflies.  I wasn't sure what to do with the gems they gave me and I didn't want it to be too "blingy" so I layered them along with the butterflies under the transparent "lace".  You can see the effect below of how that turned out.

The three pictures were three done in a row and one was nice (because she didn't know we were taking a picture)... then they got angry and mad because she didn't want her picture taken.  I just wanted a title that went along with loving her in all her ways.  I kept thinking about a children's book and I couldn't remember what it was.  Finally I just used google and voila... found the title of the book.

There's a little ribbon that is tucked between my background paper. Can you find it? Don't you just love wooden veneers??? I cannot get enough of them. Again, it was inspired by this SOUS sketch. Here's how the layout turned out!


In the spirit of valentines day, here's a couple things I had been up to.  I went over to BusyBee Dayhome to do some valentines crafts with the toddlers.  We did some valentines holders (no photo) and some jars for our Mommies and Daddys.  They each got their handprints representing "hugs" and there was chocolate hugs inside.  Very cute.
The night before Valentines, I quickly used my big shot to cut out a dozen hearts for each kid.  Sinc thee Big Shot takes three papers at a time, I did this super fast.  My husband and I then wrote why we love them on the hearts.  I then sent my hubby up to tape them on the doors.  They were a big hit!

We ordered Boston Pizza and donated to charity because we got heart shaped pizza!!  
Of course we did valentines over the past week but I didn't take pictures of them. Darn!!

I'll post tomorrow the "Tea" items that I have done. 
Cathy